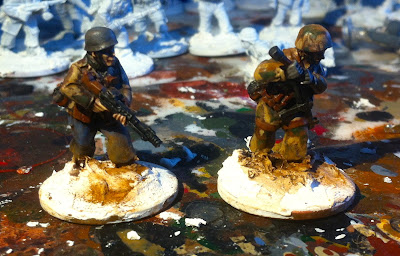
Fallschirmjäger WIP
 |
| The story so far ... these are my first non-vehicle models I've used weathering powders on. |
Anyway. On to the painting ... there's nothing new here for the base coat techniques, they're the same that I use all the time. That is:
- Block colours painted on a white base coat - I used the same splinter camo pattern as for my British SAS section. Weapons are Badab Black, the skin is Tallarn Flesh (sp?), and the field grey trousers etc are Adeptus Battlegrey. Insignia is left white for painting on later.
- Heavy wash - using Army Painter Strong Tone, although any dark brown washes of any make will do here.
- Re-highlight - using one shade brighter than step one for each colour. So Tallarn Flesh gets an Elf Flesh highlight, the field grey gets Shadow Grey 'lights (or another Adeptus Battlegrey, to give slightly varying shades of cloth). The colours for the camo is on the splinter camo link above.
- Detail - using a very fine brush, details like insignia are painted on. For parachute troops, that's Sunburst Yellow backing colours on the collar patches and tunics (where visible), and the blue-white-red roundel on the caps.
Now that's as far as my painting normally takes me. However, after being inspired by Headologist I tried using weathering powders to create a dusty, worn look and I have to say it looks incredible. I didn't do a proper before and after I'm afraid, but if you compare the last picture at the bottom (pre-weathering) and the one at the top (post-weathering), I think you get the idea.
Apologies for the (generally) appalling lighting. When I finish the squad I'll photograph them properly in daylight. Anyway, you can see the three main stages on these photos:
 |
| Block colour |
 |
| After washing |
 |
| And highlighting |
 |
| Attempts to convert a lasgunner (for ImpCommander ...) |
And that's it for today! Lots of stuff in the post now, so there'll be lots of projects to report on hopefully in the run-up to Christmas. Thanks for stopping by!
The Colonel
_________________________________________________________________________________
A few months back I remember posting up a clip from the British 70s comedy Dad's Army - and a few readers from around the world got a chuckle from one of Captain Mainwaring's and Sergeant Wilson's exchanges.
Well, for those who haven't heard the sad news, one of the stars Clive Dunn (also known as LCpl Jones) passed away in Portugal this week at the grand old age of 92. I won't bang on about what a legend the man was, I'll just post my favourite clips from my favourite episode of Dad's Army.
Well, for those who haven't heard the sad news, one of the stars Clive Dunn (also known as LCpl Jones) passed away in Portugal this week at the grand old age of 92. I won't bang on about what a legend the man was, I'll just post my favourite clips from my favourite episode of Dad's Army.
(Clive Dunn is the one on the Lewis gun at the end...)
Stand at ease, Jonesy.


I've been looking into Warlord's Stuff for a bit now, and i am really close to getting some. Would they be easy to adapt with GW bits, and did you find anything you didn't like ?
ReplyDeleteI haven't really tried the full range, but I would steer clear of the plastics if I were you. They sound nice and are probably easier to convert, but the sculpts don't have the 'bulk' that most metal figs have and tend to look very flimsy. I suspect a lasgun would look very out of place. In terms of general quality and in answer to your question, everything I've seen of Warlord's is brilliant, I've never been disappointed.
DeleteThe metal figs (like these, and all the Germans on the 'WW2' tab) are harder to convert because their weapons are scuplted very tightly to the body. That said, they look VERY good because of that, and fit in well with 40K. The added bulk of a metal miniature's arms and legs fit with the '30mm' scale of 40K.
You'll need to chop down the backs of lasguns so they can sit next to the body, but if you're prepared to do that they are a definite winner. In fact, I've had a go at converting one of the officers above into a 40K mini - I'll edit the post so you can see the results.
Thank you very informative. I wanted to work with the Thirty Years War troops to make a neat-o inquisitorial war host. perhaps i best look for some conversion arms. Added on to the fact that i'm slowly getting interested in historicals so it might do to get a set before committing much real money to it.
DeleteBeautiful as ever, and loving the "on campaign" feel.
DeleteI have to second the Colonel, Impcommander, and even the metals are on the lighter side of WW2 miniatures. If you want to give historicals a go, and WW2 in particular, trying a squad based game like NUTS! might be the way to go - that way you're not making a huge investment and you don't need to butcher the figures :) And it's a brilliant game
Nice tutorial Col. and great looking paintjobs.
ReplyDeleteClive Dunn passed.... That's sad. Used to enjoy watching good clean humour Dad's Army as a lad and loved it.
The folks in your campaign are going to need an umbrella upgrade if it starts raining Nazis. Great looking paratroopers, the weathering powders do add that in the field look.
ReplyDelete