Making Vehicle Stowage From Nothing!

Hello again, and welcome back to what seems to be turning into World War Two Month at Palladian Guard. In my first posts this month I did a bit of work on some 1:56 WW2 vehicles for the first time in ages. The other day saw the arrival of the British-led Army of Freedom, and today we'll return to vehicles with a mini tutorial on how to create realistic-looking vehicle stowage from nothing!
The model is a Warlord Games Sdkfz 251 Hanomag half-track. I picked it up off Amazon second-hand, where it only cost me £10! Huzzah.
Research
 This is my favourite part of model building; I always try to use some real-world photos for inspiration with my stowage, colours and camo. That's not to say I don't take a bit of artistic license from time to time, but I like to have things grounded in reality. I have a fairly extensive collection of books for this, and Osprey books are good as they tend to be crammed with good reference photos - but even if you don't have any books the internet is great. A cursory Google search will usually turn up plenty of inspiration.
However, looking up the Hanomags (this is where the amateur historian steps in), there aren't really many photos to choose from. Most of them seem to be covered in foliage, are blown up, and have American soldiers peering into them which would suggest the majority are from Normandy. There aren't many Bundesarchiv (German Federal Archive) photos, probably because the Hanomags were just workhorse vehicles and presumably weren't that interesting for the folks back home reading the papers? Just a theory.
Construction
Anyway, I didn't want to obscure this lovely model with loads of trees, so I decided to just add some bits of stowage. Now this blog is a bit of a crossover between WW2 and 40K players, so any non-40K gamers who may be reading this might not have heard of this scam, where people pay £9 for paltry bits of stowage (I used to fall for this myself). So I decided to try making some without spending any money:


 Kit roll: I wanted a nice big roll of camouflage netting down one side of the model, perhaps ready to be rolled over the top in case of air attack. I found this photo of a Hummel SP Howitzer with this netting rolled across the top of the barrel. Sorted. A simple rectangle of flat Green Stuff, about 1" x 3/2" and then rolled up, was superglued to the side and while it was still wet, I tried to make it sag realistically (joke about Ms Scipio helping me with reference here? No, probably not).
To those who haven't used Green Stuff in this way before, all I'd suggest is a flat, smooth surface and lots of water everywhere, to stop the stuff sticking together too early. Roll it up, then cutting two thin strips. Remember, press the knife down into the green stuff to make a cut, don't cut and drag or else you'll loose the flat regtangular shape. See my amazing work of art for the full story.

Tow rope/cable: This stuff is remarkably cheap and easy to come by. Don't get specialist modelling stuff; just buy some cheap wine from a supermarket. Some bottles come with a brass wire netting around it for some reason. All I know is it's a perfect modelling product!
Just pull it into a long strand, fold/roll it up back into a realistic looking shape, then add it to the model with some thin superglue. Easy!
 Kit bags: I'm not a sculptor, but I always try and do bits here and there to improve my skill as I go along. My latest attempt was the green stuff kit bag on the beams of wood - just a little sausage of GS with two 'straps' pressed in with a knife. I'm sure the more skilled amongst you will be able to do something far more impressive.
Wooden Beams: Tanks and vehicles sometimes carried (and still do today) beams and planks to aid in freeing a bogged-down vehicle. These are simply leftover bits of sprue - that's all there is to it. I'll paint them brown and maybe do a wood grain effect to emphasise this.
 Texture: Before I move onto painting, I'll probably add a bit of texture to the camo netting, and maybe a few more straps and ropes so that things don't hang magically off the side.
And there is is. About 20 mins work, and apart from a modest chunk of Green Stuff that was all free! Give it a try, and see what you can come up with from the litter on your modelling desk! I'll do an update later on in the week with painted photos. Hope you all found it a bit useful, and as ever if there's anything you can add then pop it in the comments below. Thanks for reading, troops; until next time!
The Colonel

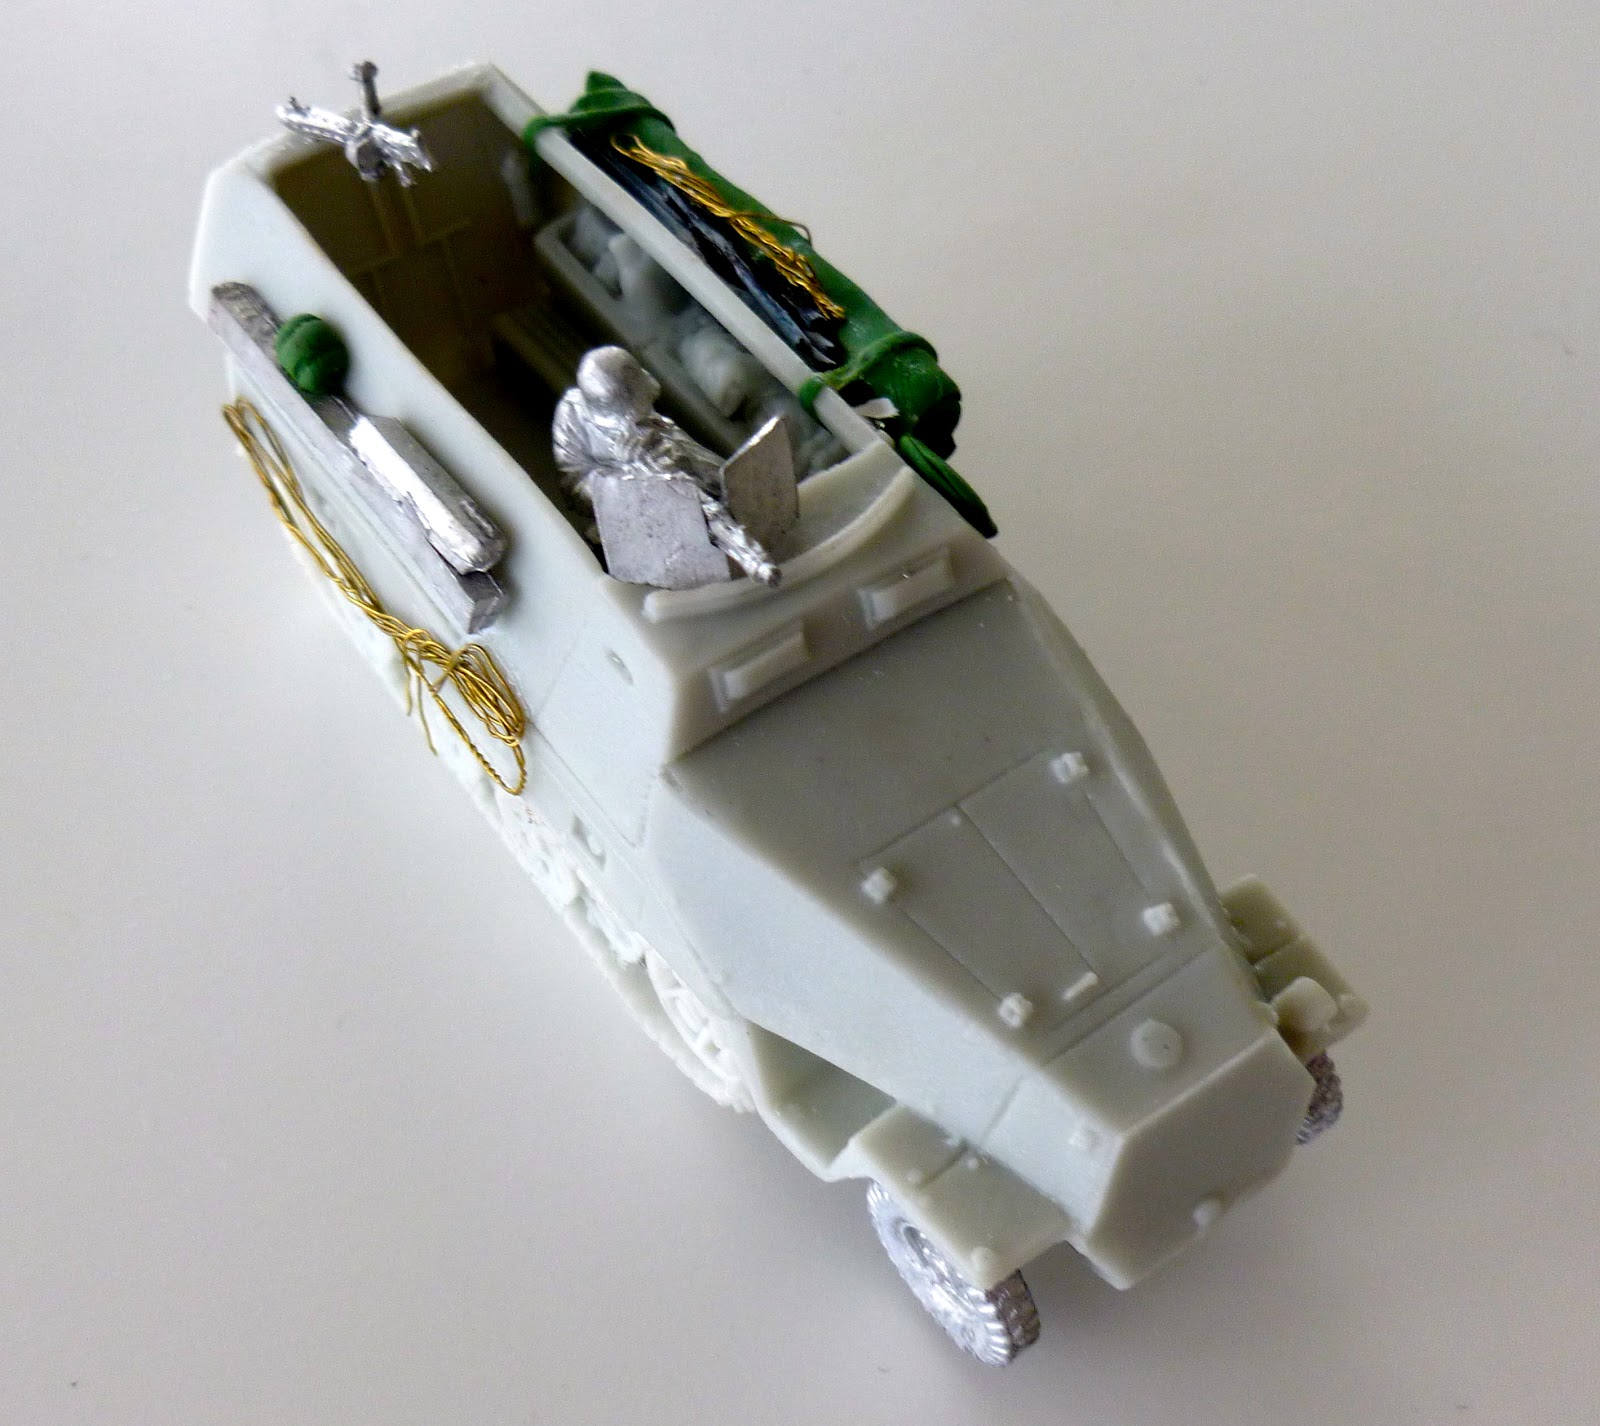
Photo Credits:
- www.manufaktur.dk
- www.militaryimages.net
- www.war44.com
- www.pjwine.com


Great tips! I love my tanks coved in stuff. I will have to give those kit rolls a go next time.
ReplyDeleteLooks great! If I ever purchase those counts-as chimeras I am planning, I think I'll individualise them with stowage much as you've described.
ReplyDeleteThanks fellas!
ReplyDelete@Col Ackland - me too. I hate the 'factory finished' look, I read a memoir of a British tanker in Normandy (the name escapes me), but I just remembered it when you said that. He recalled how you could always tell the new boys because they had nothing on their tanks, whereas he had chickens, barrels of wine, pigs etc hanging off the turret.
@Dai - cheers, and I'll watch out for them, like the sound of that. I just resent paying for stuff you can make for free!
Stunning as ever, I like anything done on a budget, and tanks covered in stuff are always great as Col. Ackland said. Gives them that on campaign look rather than Tank Museum apperance. Excellent, and looking forward to seeing it on the slate-covered slopes of North Wales ;)
ReplyDeleteBudget is the way forward, comrades ... 'tank museum' appearance; I'll remember that phrase. That's just the thing, they won't be able to drive on the slate-covered slopes of North Wales, they'll be stuck in traffic jams on the bloomin' A487 while you drop mortars on their heads!
Delete"That's just the thing, they won't be able to drive on the slate-covered slopes of North Wales, they'll be stuck in traffic jams on the bloomin' A487 while you drop mortars on their heads!"
DeleteOkay, that made me laugh. I'm a Pembrokeshire lad (I grew up mainly in Saundersfoot) and it's been fun keeping tabs on this cool sounding project of yours.
Thanks Dai! It's great to know it's caught your interest. I'm not from around the area but I've been there more than once for various adventurous excursions into the sea and up mountains. Hope you find this interesting and as a local boy I'll be eagerly awaiting your comments on this project! All I know I want to include is a German officer with an 'English' Phrase Book struggling to ask a local farmer for directions.
DeleteHaha, certainly the best way to engender resistance to the occupation
DeleteVery nice. I will have to give this a try on my next russ.
ReplyDeleteThanks, I'll look out for those!
DeleteYou need to upload some of the painted photos!
ReplyDeleteComing tomorrow ...
Delete