Wrecked Chimera WIP
Time for more photos, I think. This is a random project I've been working on for a few weeks on and off now, for a wrecked Chimera hull. This is going to serve as an objective/casualty marker when it's finished.
 The main part of this conversion is obviously the twisted, bubbling metal and ruins. This was achieved through carefully melting bits of the plastic over a candle. WARNING: Just to point out to anyone who doesn't know this already, it is incredibly dangerous and should only be attempted by highly irresponsible wargamers since the smoking plastic fumes are very toxic. It goes without saying that this should be done outside, that you should sit upwind, and ideally not breathe in while doing it. I held my breath, melted a small bit of it, then set it down and retreated for five minutes until the hull stopped smouldering. Having said that, with a bit of care you can easily create some really good battle damage effects.
 The hardest part of this conversion is 'bulking out' the interior, as this requires a large volume of material to make it look realistic, as if the tank has a proper interior. Bits of sprue helped here, but if you're not careful you can end up using loads of precious Bitz to try and make it look realistic - like I did. I'm still not entirely happy with the interior so once painted I'm going to add some permanent cotton wool smoke to 'fill the gap'. The ruined tank tracks were hard to get to stay still and I had to use a lot of glue to get them to hang off the front right hull.
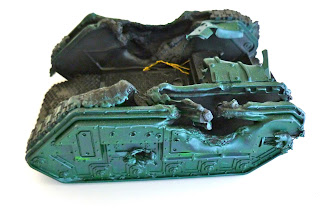
 Speaking of painting, you can see below I've done the black undercoat and a Dark Angels Green primary coat. This is going to be followed by Catachan Green, and then Dark Flesh/Graveyard Earth Stripes. I'm going to make a point of painting the thing up properly as if it were a normal, non-damaged tank, then add any battle damage over the top. Incidentally this might be a good time for me to try airbrushing for the first time, to get a smooth 'burnt' effect around the heaviest melted parts.

It started life as various components of my Bitz Box. After the other day sharing a few tips on beating price rises, I think I've ignored it all by using an expensive kit just to make a wrecked tank. Well, the side parts have been in my box since eighteen-hundred and frozen stiff, and the central parts were left over from an old Hydra conversion.
 The main part of this conversion is obviously the twisted, bubbling metal and ruins. This was achieved through carefully melting bits of the plastic over a candle. WARNING: Just to point out to anyone who doesn't know this already, it is incredibly dangerous and should only be attempted by highly irresponsible wargamers since the smoking plastic fumes are very toxic. It goes without saying that this should be done outside, that you should sit upwind, and ideally not breathe in while doing it. I held my breath, melted a small bit of it, then set it down and retreated for five minutes until the hull stopped smouldering. Having said that, with a bit of care you can easily create some really good battle damage effects.
 The hardest part of this conversion is 'bulking out' the interior, as this requires a large volume of material to make it look realistic, as if the tank has a proper interior. Bits of sprue helped here, but if you're not careful you can end up using loads of precious Bitz to try and make it look realistic - like I did. I'm still not entirely happy with the interior so once painted I'm going to add some permanent cotton wool smoke to 'fill the gap'. The ruined tank tracks were hard to get to stay still and I had to use a lot of glue to get them to hang off the front right hull.
 Speaking of painting, you can see below I've done the black undercoat and a Dark Angels Green primary coat. This is going to be followed by Catachan Green, and then Dark Flesh/Graveyard Earth Stripes. I'm going to make a point of painting the thing up properly as if it were a normal, non-damaged tank, then add any battle damage over the top. Incidentally this might be a good time for me to try airbrushing for the first time, to get a smooth 'burnt' effect around the heaviest melted parts.
Anyway: there you have it. I've seen some other objective markers around and thought I'd throw mine into the mix. Enjoy, and as ever comments are very welcome indeed. See you all next time!


Superb stuff! Your early years of torturing toy soldiers in the fireplace evidently paid off ;)
ReplyDeleteConvincing effort depicting a poor transport gone wrong. :)
ReplyDeleteShould use it as a wreck marker. Expensive if you had enough for a whole army mind.
Me and a friend of mine once took a heat gun to a partial Land Raider, we took turns playing meltgun and at the end of the day had a pretty cool looking wreck. You've done a better job with this, ours looked a bit more like Land Raider shaped slag than killed tank. Good work.
ReplyDeleteThanks again, everybody
ReplyDelete@Headologist: I knew I was right, it wasn't a waste of time!
@Dai: Yes, wreck marker will probably be its primary function. Unless I come across a free Leman Russ I probably won't be doing any more though
@Chris: Good idea - although make sure the barrel is closer than half range for that extra D6 penetration! Yes going too far was more of a danger for me here than not going far enough.
eBay for very cheap tanks or bits of tanks might be the way forward for wrecks
ReplyDeleteThere's a page full for a fiver including postage here: http://www.ebay.co.uk/sch/i.html?_sacat=See-All-Categories&_from=R40&_nkw=leman%20russ&_sop=2
ReplyDelete